DIY Fixer Upper Home Decor & Inspiration

7.4.15


When we first moved to Boston we were living out of a hotel room for about the first 2 weeks.... with all the snow storms, catching a cold & having to branding to work on, I was in our room a lot! This is when I first encountered Fixer Upper. First off- I wish was doing what Chip & Joanna do on that show. They honestly are talented, seem to be fun & happy people who create beautiful spaces! I mean BEAUTIFUL! One of my favorite little home decor accent pieces on the Fixer Uppers was this:
Fixer Upper: A Craftsman Remodel for Coffeehouse Owners | HGTV
From their Remodel for the Coffee House . I remembering seeing it on the show & ended up finding it on Pinterest .

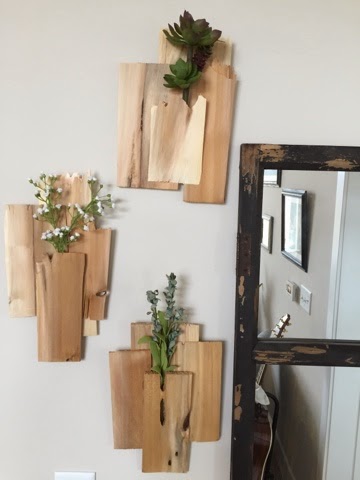
So, of course I had to make my own! We have a pile of wooden shingles left over from our 
entrance nook & bed frame. 
I dipped into my extra wood bucket & picked out a few that I liked and got to work! 

Here is a sneak peak of mine! 


I did a TON of DIY projects on Sunday which happened to be Easter. I wasn't feeling the greatest & Ryan knows:
1. I LOVE banana pancakes 2. I love cute little things 3. I LOVE my DIY time....he knew that once I started to craft that I wouldn't stop to eat or even pee! I get so caught up & really do not like stopping- I just loose track! Plus, I think he heard me talking to my family about how since it is just Ryan & I we don't really get into the holidays :/ I miss holiday spirit! Growing up we always went all out for every little holiday that is is just weird to not. But look what he did! 
Gluten Free & Vegan Bunny Banana Pancake! Brownie points awarded here. 

Dang my need to be creative! I wish I was getting paid to DIY, 
that would be the best of both worlds.... Do what I love & have a job....too good to be true I guess. 

Okay, back to those awesome wood & plant accents, I am not 100% sure what to call them. 
What do you guys think they are called? 
Here are the supplies I used. 
a saw
I use this glue when I do my reclaimed wood artwork as well. It is drys strong & works great!
Wooden shingles-you can buy a bundle of them at Home Depot or Lowe's for pretty cheap!
I bought these lovely little greenery items from Micheals (use your coupons!)...Ryan took 10 steps in & said I should probably wait in the car huh & walked right back out. No argument there! I enjoying wondering up & down every aisle even though I have a list of what I need & pretty much know exactly where it is in the store- I just like seeing everything! Great Inspiration & who knows, sometimes I find what I need but in a different option or something similar that might work even better! 

I am in a group text with my two besties. We were telling each other what we were doing on Easter am.... this was my response. 
So I cut/ broke some of the shingles just about in half. I messed around what the layout of them for a few minutes. After changing the placement of the shingles various times until I found the look I wanted, I used the wood glue to hold their placement.

Very carefully I moved all three over out of the way.  
I added a small amount of weight on top of all three to aid the glue in the drying process. 

Here is the outcome! I LOVE them! 
I am going to make sets of three for others if interested let me know! 


I think it would be fun to make these so you could change out the greenery/flowers with the season! 
I think I will do that actually! 
Do you have a favorite DIY from HGTV? Which one should I do next?  


Jewelry, Design & Wine- A creative night out!

6.4.15

There is a new way to enjoy a creative night out! & look what you leave with!!

I made this! Yes, I am crafty but even if you aren't you could make this too! They supply EVERYTHING, included the step by step instructions & assistance to get you through so you leave with a beautiful, handmade piece pf jewelry!


Relax with a drink while you are socializing and making a one of a kind piece of jewelry-
that you take home!
Jewelry Design & Wine has found the perfect mixture for a fun, creative night out!

With the top jewelry trends constantly changing & ladies always looking for a reason to have a fun night out with each other, this idea has become a new way of having a "Ladies Night Out".
Although, I will have to say that men would enjoy this as well. Get out with co-workers, make something special for a lovely lady in your life or splurge and make something for yourself!
Leather does look pretty good on a man ya know.

Jewelry Design & Wine has lots of fun, creative ideas planned so if you enjoy DIY, trendy jewelry, socializing & wine- get to the event list & register for their next event!

I love the fact that while you are enjoying a fun night, you are making a piece of jewelry that is personalized, handmade & you can walk out wearing it! Plus, with their jewelry designs always changing, there is always something new to make. I love a reason to get/make jewelry.

Just imagine all those times where you say:
"Honey, I have a another work event tonight", "It is ladies night again", "Team building event tomorrow, sorry!" , & "Ugh, we have a work event tonight".... now picture you doing those things but sipping on some delicious wine & leaving with a beautiful piece of jewelry- that you made!

 Okay, now that I have gone off about how awesome this idea is, I will share my own personal experience with you all.....of course had to attend one of their events for myself to really see what is buzz is all about!

Getting ready sometimes can be a challenge...who am I suppose to ask about my outfit? What shoes look better? With Ryan always working and my two best friends in FL we send a lot of pictures with questions, in seek of advice.  
So this is how I ask my girls what shoes look better 
We went with the ankle boots in-case you are curious :) 

Okay Jewelry Design & Wine. I do not want to give everything away but 
I will tell you enough that it will make you want to go! 
Upon arrival, you simply get settled. Everything you need is already set up. Only thing left to do is pick out your materials for your soon to be beautiful new piece of jewelry 
& order a drink of your choice. 

They provide you with a cute little box to keep all your chosen materials in. You get to pick between gold or silver along with the size of your pendant & color of beads for the bar. 

Here is the little work station you will have for your jewelry making. 

I didn't know anyone at this event, besides the ladies who started Jewelry Design & Wine, who I had only met the day before. It was a really fun, friendly environment. I sat across from the lovely Sarah who is a blogger herself at Parker The Prepster. It was her first time making her own jewelry & she rocked it! Turned out super cute with her faint little stamped heart pendant. 
Thanks Sarah for all the blogging tips & being so friendly! Drinks soon! 
Like I mentioned before, they tell you step by step of what to do. If you are a work at your own pace crafter, slower or faster than others- No Worries! That works too! If you are faster, use this time to socialize & drink! That is what I did & it worked out perfect!
I found that laying everything out on this mat they provide was the easiest way to track & keep your supplies. Plus, it is super soft & you are going to keep touching it anyways....promise you will find yourself rubbing this little guy, 
The hardest part of this entire necklace was said to be the wire wrapping or the stamping. I heard mixed opinions....BUT- keep in mind, it is handmade, unique & isn't EVER intended to be perfect! You are making it which makes it awesome already so if you slip here or there, your stamping isn't perfect or you wrapping is more of a wild twist- no worries, it will still be beautiful! 

All done! More time to drink & socialize for a little bit. Literally everything you need is just on the table or your instructor hands it out to you along the way. 
I wish I had this service at home when I am making my jewelry! 
Along with my server who brought my wine! 

Close ups! 
They give you a little tag to add which I thought was such a cute personal touch! You can personalize it however you want. A cute way to really show the handmade quality & personality of your new piece!! I love tagging jewelry. 
I choose an & symbol because I did an A on my circle pendant & didn't want 2...even though that would have been perfect for my initials! DANG!...well & I love & symbols.....#toomany&s 


Sign up today for their next event! If you are not in the Boston area- no worries, simply express your interest in Jewelry Design & Wine coming to your area by letting Sarah know you like this idea. 
Be sure to mention you found out from my blog

DIY Blanket Ladder

2.4.15

I made a DIY Blanket Ladder under 1 hour
& reused wood & screws I already had!!

I have wanted a ladder to display/hold our blankets for a while now. All the ladders I have found & like are rather pricey...for an old ladder. 
So me being me, 
I decided to make one. 

I used wooden slates from our old headboard. We originally made our bed frame & when we moved to Boston we had to take it apart...I couldn't let all this wood go to waste! 

So here are photos of our old bed frame & the headboard.

Queen bed frame that Ryan built.

Queen head board that we designed, built & painted.

Here I am taking apart our old headboard so I could reuse the wood slats!

Personally I think living in an apartment complex is wonderful, I LOVE it! 
Although it does have its downs...like not being able to build things whenever I want. Also not having more space to work. Oh well, after moving some furniture around and laying out an old painters tarp, my work space was good to go! 

I am not one to actually follow plans. I find ideas via Pinterest &
 pin them and figure out how to do it myself....sometimes it works & sometimes it doesn't. 


I do not recommend doing this alone unless you have the proper tools. I am not going to lie, it was complicated. Luckily it worked out okay but could have easily become a disaster! 

I started by measuring the boards I already had & lucky for me they were 5 feet which is what I wanted for height. I left two at 5 feet and cut one slat down into 3 sections at 18 inches each.

I laid one side down flat and measured 13 inch spaces down the ladder. Then I drew slanted lines marking the angle the slates should lay & where to screwed in. 
This is the part that was complicated since I was doing it alone. Have someone help you to hold the boards in place and so they are more stable when you are screwing. I put two screws on each end. 

I had chosen to only have 3 spaces to hang blankets but 
you could alter measurements to do more or least. 
It is a DIY-you can do it however fits your needs & wants! 


I still need to stain the rest of the wood but want to wait until it is a bit warmer outside. 
For now, here it is! 


As long as you have wood, screws, a tape measure and a screw driver you can do it! 
I can't wait to see how your blanket ladders turn out!


Made With Love By The Dutch Lady Designs