DIY Book Page Dahlia Medallion

14.4.15

I have found a new passion for the Dahlia flower. It is just simply beautiful! 

I am in the process of drawing one for my tattoo idea & while searching ideas, colors & all that jazz I found a DIY for one! 

Here is my Dahlia Medallion. 

Here is the jest of the materials that you will need to create your own.


an old book...choose the smaller one
some cardboard...I recommend something strong than the cereal box I used
scissors
tape, hot glue gun, stapler (w/ staples :)
x-acto knife or box cutter
& patience

I used a lid from a storage container to trace my circle. I would say I did a medium size circle...any larger and my medallion would be consider, well HUGE in my books. So trace that & cut it out. 

To get ready, cut heaps of pages from your book. Just run your X-ACTO knife along the edge of the binding of your old book. 

This might take a few rolls to get use to. Find a roll pattern that you like and can repeat over & over & over & over more times that you will want to. 
I held my pages horizontally & rolled from the left. 

Roll more than you think. My first circle held over 30 of these lovely little "petals".
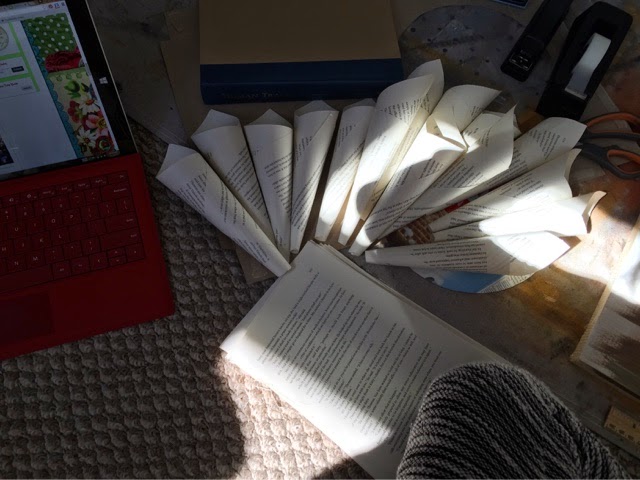
Once you have a good amount you can start stapling them to your cardboard circle. Keep them close together, tight & the same distance around the entire circle.

I am not perfect either, no worries. It will still turn out beautiful! Just make sure you line up the tops of the "petals", don't worry too much about the area being stapled- not going to see it anyways! 

Okay, one (annoying) layer done! 
now the next....roll more as needed! I liked to get a bunch ready and than tape away. Yes, tape. You should probably hot glue or super glue but I wanted to get one made do have it. When I do this again I will be using my hot glue gun to hold this lovely creation together.
I did in total 5 rows of petal. I keep them all the same size besides my 5 row where I cut my pages in half. Rows 1-4 just adjust the petal in more for each row and glue in place. Make sure you put each row of petals between & lower the previous row.
For the center I cut one of the rolls way down and used the extra pieces inside of it to add the petaled look in the center of the flower. You could do whatever you want. Add a button, wire, metal, bottle cap, felt...the options are endless here- get creative! 
Yay! So fun! I loved the turn out. I can't wait to make another one! I want to do a set of three smaller ones with a metallic trim on the pages. 

Ryan & I decided to hang it here. 
It fit perfect & help with all the empty space we had above our TV & fireplace.

Make your own medallion.....or take the easy route & ask me to do it for you! Other fun options for these medallions coming soon! I want to hear your ideas or color requests too! 

If you are more of a step my step person be sure to check out Jennifer Kelly's Enchanted Petal blog on her How to make a Paper Flower Medallion. 

DIY Coffee Table

9.4.15

If you read my blog regularly, you know that I enjoy DIY & normally drag Ryan into it....actually I go to do it & he takes over thinking that I will mess it up. Secretly- that is my plan all along! I find a DIY project that I could easily do but I know that Mr. Perfect over here will want to do it his way....win, win!

Since have have move into our Cambridge apartment we have used this wicker trunk as our coffee table...

than we put our old headboard on top of it to use...


While getting my Monday inspiration via Pinterest, I came across a few DIY coffee tables that I liked. Ryan & I got discussing them, tossing around our ideas & Ryan decided to just go off what he was thinking rather than use any of the free DIY plans I had found :) .... Luckily I normally end up loving it. It takes us a bit to get on the same page. We can see the end result of what we want immediately but we takes VERY different paths of getting there, so the planning is normally something that is...entertaining. 


Our building work space was rather similar to my DIY blanket ladder set up.

Ryan was creative with his sawing station.


This is what happens when I ask Ryan to take photos....he takes selfies. 
& he thought I wouldn't really post this.

We decided to make it a tradition to have a Sunday Build Day with yummy treats. 

We build two rectangular ends for support. 


Our original plans for the top had changed MULTIPLE times while at home depot... we ended up with this one because it was pre-cut, smooth, had character and adds a sleek look to the table. 

We choose casters that had rubber wheels. These were not my first choice but we compromised :) 

Then this happened! REALLY! Luckily we have more but seriously....

Once we had it all screwed together, our table looked  like this. Here you see the rough idea of what it will look like. The top here is not screwed or glued on yet. We are adding angled accents to the ends before we finish the top. 

Apparently this is Ryan's new thinking spot. He had to really get in there to think about the angle & how to do it with just a pencil & a saw....no true measuring tools for angles. We keep failing on picking some up no that our home improvement store visits have diminished down to 
once a month if that! 

He took to his sketch pad, drawing & doing math...
While I just flipped up the coffee table onto its side and laied the 2x4 down flat. I adjusted the angle of the 2x4 until it was placed in the middle & we had the right angle. Ryan quickly caught on to what I was doing and traced the lines with a pencil to mark the angles needed. 
This is the way my mind works- my brain goes towards visual references, NOT MATH! That is where we are VERY different, Ryan even mentioned that the math he was doing was easy & fun....tell a creative minded, dyslexic girls that, I just laughed. 

While I was at an event, Ryan worked on the angle and finished screwing and glueing it all together. 


Here it is! Only thing left to do is to stain it...but we need some warmer weather & rain free days before I tackle that!


Super Cute DIY Bow Tie Shirt

7.4.15

Do you have an old t-shirt, sweat shirt, off the shoulder shirt or even a t-shirt dress that you don't wear because of simple wear and Tare? Well let's turn it into a cute bow tie shirt now shall we.

Materials: 
Old clothing 
Random pieces of fabric
Fabric glue or sewing tools
Scissors 
Creatively or ability to follow my visuals :) 


For some reason I just haven't been able to toss this old gray shirt...& I am so glad I didn't! To start I just layed everything out on a table.
 
You are going to want to draw a line down the center of the back of your clothing. I used white chalk and eyeballed the center...not one for measuring but if you are go for it! 

Once it is cut you can do your bow ties! I went through my random collection of fabric and found ones that sort of went together. I eyeballed the size I wanted here too. I had left over mustard yellow felt that I cut into tiny ribbon like pieces and wrapped the bow ties using a pin to hold them. 
  Not that they are all pinned...
I placed them onto my shirt to figure out the spacing there 
At my cut line down the center of the back of my shirt I folded the fabric in/under. I wanted to do this without setting up my sewing machine or having to hand stitch anything so I used fabric glue to hold the folds, bow ties, ribbon wrap and well everything I did here. 
 
Now that the bow ties and folds are glued go back and double check areas that may need some glue touch ups

*while you are gluing you might want to have a divider in between the front & back of your shirt so the glue doesn't seep through and adhere to he other side (or your fingers)!! :) yes, I learned the hard way. One of those things I knew I should do but didn't based off I was only 1 coffee down at least point in the am. 

So now that everything should be glued together, hang it up with the divider in between- get crafty with keeping the divider in place. Punch a hole, pin it tape it... Just keep it there for the sneaky glue that isn't dry yet to keep it from ruining your cute masterpiece of a bow tie shirt! 

I found my inspiration for this DIY project via the wonderful Pinterest of course. Here was what made me want to make one of my own: 

And this is how mine turned out. 

Next time I will just whip out my sewing machine.....


Made With Love By The Dutch Lady Designs